Please refer to Window Movie Maker – II Class 12 Computer notes and questions with solutions below. These revision notes and important examination questions have been prepared based on the latest Computer Science books for Class 12. You can go through the questions and solutions below which will help you to get better marks in your examinations.
Class 12 Computer Window Movie Maker – II Notes and Questions
Fill in the Blanks
Question 1 Whenever you copy/move Video clip on the storyboard, any added ______is also copied.
Answer
Video Effects
Question 2 ____________ removes the information from the Source material.
Answer
Trimming
Question 3 We can add a _ after a clip in the movie to introduce the next clip.
Answer
Title
Question 4 We can use __ Movie option to save it.
Answer
Finish
Question 5 For editing a clip, ___ is a necessary process.
Answer
Splitting
State whether True or False
Question 1 Audio clips can only be added in the Time line View.
Answer
True
Question 2 The saved Movie can be played on the Web Page or can be e-mailed but it cannot be edited.
Answer
True
Question 3 By Zooming in on the Time line, the time is displayed in the small intervals which allow you to see project in the greater details.
Answer
True
Question 4 Transitions are stored in the Video/Audio Transition folder in the collection pane.
Answer
False
Question 5 Only those video effects can be added which are present in the video effect folder.
Answer
True
Exercise Questions
Question 1 Write the difference between storyboard and Time line?
Ans: These are the important components of the Window Movie Maker. These components are present at the
bottom of the Window Movie Maker interface. These both components occupy the same location in the interface.
Only one of these components will display at a time. The main differences between these components are given
below:
Story Board: It is a panel of pictures or other video-clips to make a story of movie. It shows the sequence of photos
and video clips that will be shown in the movie. To add a photo or video-clip to movie, we have to drag them from
the content pane to this panel. We can also rearrange the pictures or videos by dragging them in the story board.
This panel also allows us to add any video effects or video transitions to our movie.
Timeline: It is used to edit the timing of clips in our project. Audio clips that we have added to our movie project are
not displayed on the storyboard. They can be displayed in the timeline panel. To add an audio or video-clip to movie,
we have to drag them from the content pane to this panel.
Question 2 What is a workspace? What are its two views?
Ans: Workspace is an area in the movie maker where we are working in our project. Workspace consists of many
components. These compnenets help us to make a movie. Movie Task pane, Collection Pane, Content pane, Monitor,
Storyboard, Timeline etc are the important components of workspace. To make a movie in movie maker, we have to
create a project. In the project, we make movie with the help of story board and timeline. We can also add video
effects, transitions and titles in the movie. We can preview the movie in the monitor component of the movie maker
interface. Final movie can be stored on a CD or DVD which can then be played in any video player.
Question 3 What will happen of you click on the Tasks button below the menu bar?
Ans: Tasks button is available at the toolbar which is present below the menu bar. In windows movie maker, Task
pane and Collection pane occupies the same space. Only one of these panes is visible at a time. When we click on the
Tasks button on the toolbar, Collection pane will disapper and Task pane will appear in place of Collection pane.
Now, The Tasks button on toolbar will become the Collection button.
Question 4 Write the steps to combine different clips into Movie?
Ans: In windows movie maker, we can combine many clips to create a single video. To combine clips in the movie,
perform the following steps:
1. In the Contents pane or on the storyboard/timeline, hold down the CTRL key, and then select the clips that we
want to combine.
2. Click on the Clip menu.
3. Click on the Combine option.
Question 5 What is the use of Split Button on the Monitor?
Ans: Split button is available on the Monitor of the windows movie maker. This button is used to split a video or
audio-files into smaller parts. These smaller parts of video are called Clips. To use the split button, perform the
following steps:
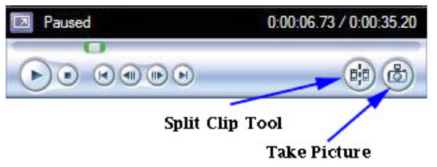
1. In the Contents pane, click the video or audio clip that we want to split.
2. Under the monitor, move the slider (seek bar) to the location from where we want to split the video.
3. Click the Split button on the monitor
We hope the above Window Movie Maker – II Class 12 Computer are useful for you. If you have any questions then post them in the comments section below. Our teachers will provide you an answer. Also refer to MCQ Questions for Class 12 Computer Science