Please refer to Microsoft Windows Class 7 Computer Science notes and questions with solutions below. These revision notes and important examination questions have been prepared based on the latest Computer Science books for Class 7. You can go through the questions and solutions below which will help you to get better marks in your examinations.
Class 7 Computer Science Microsoft Windows Notes and Questions
Introduction:
Microsoft windows is ab operating systems and GUI (Graphical User Interface) produces by Microsoft, the software company. Bill Gates is the chairman of Microsoft, which he founded with Paul Allen. Nowdays approximately 90% of all personal copmuters are running on windows. It was introduced as a GUI that simplified DOS command and tasks by converting programme and commands to icons.
In 1983, Microsoft announced the development of windows, a GUI for its own operating system MS-DOS, which has developed for IBM PC and compatible computers since 1981.
Microsoft Windows is a series of graphical interface operating systems developed, marketed, and sold by Microsoft. Microsoft introduced an operating environment named Windows on November 20, 1985 as a graphical operating system shell for MS-DOS in response to the growing interest in graphical user interfaces (GUIs).

First version of windows:-
Microsoft Windows version 2 came out on December 9, 1987, and proved slightly more popular than its predecessor. Much of the popularity for Windows 2.0 came by way of its inclusion as a “run-time version” with Microsoft’s new graphical applications, Excel and Word for Windows.
Definition of Microsoft:-
Microsoft is the world’s leading producer of computer software. Microsoft was incorporated in 1981, but the company’s roots go back at least as far as 1975, when the first commercially available personal computer appeared on the cover of Popular Electronics.
Family of Microsoft Windows
Windows has seen nine major versions since its first release in 1985. Here’s a brief look at the history of Windows.
Windows 1
This is where it all started for Windows. The original Windows 1 was released in November 1985 and was Microsoft’s first true attempt at a graphical user interface in 16-bit.
Windows 2
Two years after the release of Windows 1, Microsoft’s Windows 2 replaced it in December 1987. The big innovation for Windows 2 was that windows could overlap each other, and it also introduced the ability to minimize or maximize .
Windows 3
Windows 3 was the first version to see more widespread success and be considered a challenger to Apple’s Macintosh and the Commodore Amiga graphical user interfaces, coming pre-installed on computers from PC compatible manufacturers including Zenith Data Systems.
Windows 95
As the name implies, Windows 95 arrived in August 1995 and with it brought the first ever Start button and Start menu. Internet Explorer also made its debut on Windows 95.
Windows 98
Released in June 1998, Windows 98 built on Windows 95 and brought with it IE 4, Outlook Express, Windows Address Book, Microsoft Chat and NetShow Player, which was replaced by Windows Media Player 6.2 .
Windows ME
It was the consumer-aimed operating system coupled with Windows 2000 aimed at the enterprise market. It introduced some important concepts to consumers, including more automated system recovery tools.
Windows 2000
Microsoft’s automatic updating played an important role in Windows 2000 and became the first Windows to support hibernation.
Windows XP
Windows XP was the longest running Microsoft operating system, seeing three major updates. Its biggest problem was security: though it had a firewall built in, it was turned off by default.
Windows 7
It was faster, more stable and easier to use, becoming the operating system most users and business would upgrade to from Windows XP.
Windows 8
The new tiled interface saw program icons and live tiles normally associated with “widgets”. Windows 8 was faster than previous versions of Windows and included support for the new, much faster USB 3.0 devices.
Windows 10
Announced on 30 September 2014, Windows 10 has only been released as a test version for keen users to try. The “technical preview” is very much still a work in progress.
Ms-Windows related Terms:-
1) GUI (Graphical User Interface) :-
Stands for “Graphical User Interface,” and is pronounced “gooey.” It refers to the graphical interface of a computer that allows users to click and drag objects with a mouse instead of entering text at a command line. Two of the most popular operating systems, Windows and the Mac OS, are GUI- based. The graphical user interface was first introduced to the public by Apple with the Macintosh in 1984. However, the idea was actually taken from an earlier user interface developed by Xerox.
2) The Desktop:-

3) Icons:-
An icon is a symbol/picture that acts as a button to open up a folder, document, application or other object. All icons need to be double clicked in order to open.
4) Interface:-
It is a technique to communication or meet two independent systems with each other. An interface allows a human beaing to interact with a computer, a telephon system of other electronic information system. It can be of several types. The user interface allows the user to communicate with the operating system with the help of keybord and muouse etc. languages and codes that the application use to communicate with each other and with the hardware are called interface. The hardware interface with wires plugs and sockets that hardware devices use to communicate with each other. Network interface allows users to communicate between two terminals or terminal and network.
Windows Desktop:-
The “Desktop” is the general work area of your computer. It gives you access to programs, folders and documents that you use frequently. This area is customizable on your own computer, though it is not something that can be changed on a public computer at the library.
A small arrow of blinking symbol in desktop is called cursor. The Desktop offers many features that make using your computer easier. You can easily start programs or applications, copy and move files from one place to another and drag and drop files and program where you want them on the computer or even on to a program’s icon to open a file. Open and Save menus are streamlined to allow all applications to have the same basic features plus program specific features.
Operating systems are often backwardly compatible with older system so that older programs will run. Usually when new programs are created they are designed to work with the newest operating system to allow them to use all the newest features.
Windows terminology:-
The following are just some of the terms used to describe the Windows desktop you are likely to run into. Most are indicated in the diagram below the list:
– Desktop refers to the background of your screen on which the various programs run. Think of your computer screen as your electronic desk.
– Icons are those small pictures on the desktop and inside folders that represent various programs and sometimes folders.
– Folders are containers that can contain icons, programs, data or other folders (sub-folders). The default folder icon looks like a Manila file folder.
– Title bar refers to the bar at the top of an open window that will tell you what the folder/window is (the title) and contains the minimize, maximize and close buttons. You can also use the title bar to move a window around.
– Cursor is the graphic which indicates where the mouse is and what sort of action it is performing. The cursor will change from the default arrow to various shapes according to the purpose it is serving at the time. For instance, it may form an I-beam shape when you are selecting text in a document or a double-arrow when you are resizing a window.
– Task bar refers to the bar usually at the bottom of your Windows screen (it can be moved) with the Start Button on the left and the clock on the right.
– The Scroll Bar appears when there is more information in the window than can be displayed. This is usually a vertical scroll bar, but a horizontal scroll bar may display if the width of the window is too narrow.
– The Address Bar allows you to navigate up and down a series of windows by double-clicking on a folder. The folder with the Back/Fwd Buttons in Windows 7 would allow you to return to the previous folder.
The Window
The window (from which the term “Windows” is derived) has various elements. The most common are labelled in the Windows 7 diagram below:

Menus
The Windows Menu System
Consistent Menus
Where available*, there is a consistency to Windows menus across various programs. You will almost always see the File, Edit, View and Help menus in the same order although other menus specific to the program you are using may be in between some of these.
- File: contains the filing options as you might expect such as open and close documents, but also the printer options and usually others such as page setup or import/export options.
- Edit: contains copy and paste as well as other selection items. It sometimes contains the options for the program you are viewing.
- View: contains options to change the items you are viewing, including toolbars options.
- Help: contains help, but clicking on the About sub-menu will give you the program version.
Sub-Menus:-
You’ll often see sub-menus indicated by a small arrow (like a triangle) at the end of menus with additional choices. If you hold your mouse over the menus, they will open up to display their contents or you can click on them.
Keyboard Alternatives:-
I briefly mentioned menus in the screen shot of the window, above. If you look closely, you’ll see that some of the letters are underlined*. By using the Alt key in combination with the indicated letter, you can navigate the menu without a mouse — something that is useful if your mouse is not working or if you are typing a document and don’t wish to leave the keyboard to use the mouse.
You’ll also see other keyboard shortcuts listed to the right of menu items. For instance, Ctrl+p (press and hold the Ctrl key, then press the “p” key) will print the current document.
Windows & File Extensions:-
File extensions are the part of the filename that is after the dot in Windows. For example, a text file like readme.txt has txt as its extension. Old DOS programs used to be limited to eight letters/numbers before the dot and three after (hence the term 8.3 was commonly used) but no spaces and many characters were “reserved.” Current Windows systems allow spaces and can use up to 256 characters.
Extensions Tell What Type of File
The extension tells Windows how to deal with a certain file by identifying the type of file it is. By associating a certain extension with a default program to deal with that sort of file, you can open the program by double-clicking on the filename. The type of file is usually indicated by its icon as well.
Common Extensions
There are hundreds of extensions, many of which are proprietary (e.g. specific to a particular program) and quite a few that are legacy (no longer in active use). Some of the more common ones are:
– .txt text file
– .doc Microsoft Word document
– .docx Microsoft Word open XML document — Word 2007 or later
– .xls Microsoft Excel spreadsheet
– .xlsx Microsoft Excel open XML spreadsheet — Excel 2007 or later
– .ppt Microsoft PowerPoint presentation document
– .pptx Microsoft PowerPoint open presentation document — PowerPoint 2007 or later
– .html Web page (Hypertext Markup Language) file
– .mp3 audio (music) file
– .pdf Adobe Portable Document Format file (Adobe Reader)
– .jpg JPEG image file (usually a photo)
– .iso Disc Image File used to create a CD or DVD
Angerous Extensions:-
Some Windows extensions can indicate programs that can do harm to your computer. You should always be careful with files that have the following extensions, particularly if attached to an email message, because they can be used to install malicious or unwanted programs:
– .pif program information file
– .exe executable (program) file
– .bat batch file — can call other files including program or scripting files
– .scr scripting file — sometimes mistakenly called a screen saver file
Most users should not see any of these sorts of files attached to emails. While any of these could be legitimate files it is more likely that its purpose is to infect your computer with a virus or other malicious program.
Taskbar:-
The task bar was introduced with Windows 95 and has been part of every version of Windows since then. It is the bar that spans the bottom of the screen and contains the Start button on the left side and the systray on the right. The task bar also includes the current time on the far right side and can hold shortcuts to programs directly to the right of the Start button.
Most of the task bar, however, contains shortcuts to open windows. Whenever you open a program or window, it shows up in the task bar. So if you have Internet Explorer and Microsoft Word open, there will be at least two items in the middle area of the task bar.
Since each window gets its own location in the task bar, if there are two Microsoft Word documents open and three Internet Explorer windows open, there will be a total of five items in the task bar. When you click on a window title in the task bar, that window will become active and show up in front of other open windows. You can also cycle through the task bar items by holding the Alt key and pressing Tab a few times.

Start Menu;-
The image below is what you would see if you put your mouse pointer over the Start button and gently click one time with the left mouse button. This image is clickable. Put the tip of your mouse pointer on an item and gently click one time with the left mouse button. Caution: Not all of the items in the window are clickable.

Programs:-
The common way to get to any program or application stored on your computer is to slide your mouse pointer up to the programs menu, then select an application which you want to work in. This is also where you will go to get to the built-in items that you learned about earlier. You are not required to click on this area of the menu, but you may. Whether you click or not, move your mouse pointer quickly to the right into the list of applications. In the window above you have a clue that there will be more choices displayed when your mouse pointer moves to that area. See it? The triangle pointing to the right indicates that more selections can be found in Programs, Favorites, Documents, Settings, and Find.
Documents: –
The Find menu of most applications will display the most recent documents saved while working in that application. This menu choice displays the last fifteen documents that were saved in any application on your computer. This is a quick and easy way to get back to a document to continue work.
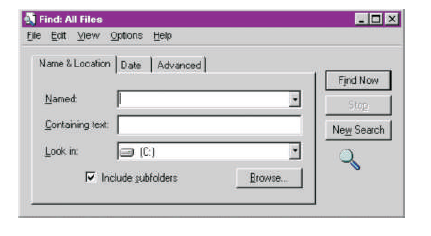
Find :-
“I saved it! I know I did!” I know you have either said that, or heard someone else say that. Whenever you save a document, the Save window indicates the location that the document was saved to. New computer users don’t always notice where their masterpiece was saved. That is what this menu choice is for. Think about that for a minute. Yes, that’s right! Everyone has trouble, at one time or another, remembering exactly where a document was saved.
Steps for using the Find menu choice:
- Using the left mouse button, gently click one time on Start
- Slide your mouse pointer up to Find and gently click one time
- Slide your mouse pointer to the right so that it points to Files or Folders and gently click one time
- Remember some part of the file name and type that in the Named: box
- Check the Look in: box and make sure you are searching the entire computer, not just a directory or disk.
Help :
No, you are not the only one that needs Help from time to time. The people that wrote Windows knew that and have provided a very large index of topics. The first few times you use Windows Help you will probably want to use the Contents tab as you see in the window below. If you have an idea as to what you are looking for, use the Index tab

Shut Down :-
If your computer is not frozen you should shut your computer down using the Shut Down menu. Do not automatically press the Enter key when you see the Shut Down Windows dialog box pop-up.
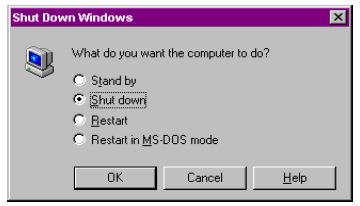
Windows remembers the last thing that you did with this dialog box. If the last thing you did was Restart and you press the Enter key you will Restart not Shut down. Develop a habit of carefully reading the dialog boxes that pop up.
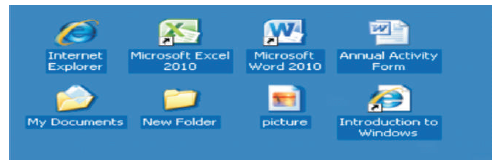
Desktop Items :-
The visible image that covers your entire screen is known as your Desktop. On your desktop are several small images called icons. You may also have icons that appear to be file folders. Each time you save something to the Desktop, an icon is added there. Some of the icons are known as Shortcuts. Those are small instructions which tell your computer where a larger program is located. To find out about each of the elements displayed below, click on the item.

My Computer – This icon displays the main components of your computer. You can open any of the items in this window to further examine the components of your computer.
For Example: put the tip of your mouse pointer on the 3 1/2 Floppy (A:) icon and gently click two quick times on the icon to see what is in your floppy disk.

My Documents – Unless you instruct Window otherwise, the standard (default) place where your documents are saved is in My Documents. As you create more documents (known as files) on your computer you may wish to save them in other places. As you are getting accustomed to using your computer My Documents is a good place to save things.
Internet Explorer – Double clicking on this icon will launch the Internet browser named Internet Explorer.
Netscape Communicator – Double-clicking on this shortcut will launch the Internet browser named Netscape Communicator. Notice the bottom corner of the Netscape icon has a small white box with a black arrow pointing up to the right. That symbol signifies that the icon is a shortcut rather than an application icon. It is OK to throw away a shortcut. However, it is not OK to throw away an application icon.
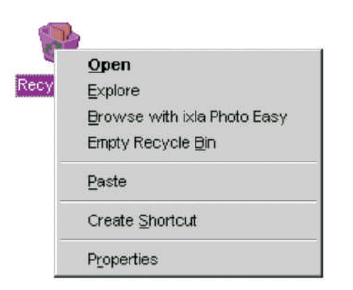
Recycle Bin – Speaking of throwing things away, this is the place there they go when you delete them from anywhere except a floppy disk. Items deleted from a floppy disk are immediately discarded from your computer. Anything else you delete goes to the Recycle Bin. Items in the Recycle Bin may be removed from the bin, or the Recycle Bin may be emptied. To empty the bin, place the tip of your mouse pointer on the bin icon and gently click one time with the right mouse button. When the pop up menu appears, slide down to Empty Recycle Bin and gently click one time with the left mouse button. The Recycle Bin has been emptied, those items are gone from your computer (unless someone like the FBI is looking at your hard drive – Yeah, it left traces of itself which can be discovered by someone who really knows how to look.) Moral: don’t plan something illegal on your computer 🙂
Title Bar:-
A title bar is a graphical user interface (GUI) component of a software application or Web page. It holds related metadata and is used to define the name of a window, software or visible interface.
Scroll Bar:-
When the contents of a window are too large to be displayed entirely within the window, a scroll bar will appear. For example, if a Web page is too long to fit within a window, a scroll bar will show up on the right-hand side of the window, allowing you to scroll up and down the page. If the page is too wide for the window, another scroll bar will appear at the bottom of the window, allowing you to scroll to the left and right. If the window’s contents fit within the current window size, the scroll bars will not appear.
The scroll bar contains a slider that the user can click and drag to scroll through the window. As you may have noticed, the size of the slider may change for different windows. This is because the slider’s size represents what percentage of the window’s content is currently being displayed within the window. For example, a slider that takes up 75% of the scroll bar means 75% of the content fits within the current window size. A slider that fills only 10% of the scroll bar means only 10% of the window’s contents are being displayed within the current window size. Therefore, if two windows are the same size, the one with the smaller slider has more content than the one with the larger slider.
Most scroll bars also contain up and down or left and right arrows that allow the user to scroll in small increments by clicking the arrows. However, clicking and dragging the slider is much faster, so the arrow keys are typically not used as often. Also, some mice have a scroll wheel that allows the user to scroll by dragging the wheel instead of clicking and dragging within the scroll bar.
Menu Bar:-
A menu bar is a horizontal strip that contains lists of available menus for a certain program. In Windows programs, the menu bar resides at the top of each open window, while on the Mac, the menu bar is always fixed on the top of the screen. Despite this major difference, the menu bar serves the same purpose on each platform. Nearly all programs have a menu bar as part of their user interface. It includes menu items and options specific to the particular program. Most menu bars have the the standard File, Edit, and View menus listed first.

The File menu includes options such as Save and Open File…, the Edit menu has items such as Undo, Copy, Paste, and Select All, while in the View menu you’ll find viewing options such as changing the layout of open windows. Word processing programs, such as Microsoft Word, also include menu options such as Insert, Format, and Font which you will most likely not find in a Web browser’s menu bar. But a Web browser may contain menu options such as History and Bookmarks, which you will not find in a word processing program. Many items located within the menu bar often have keyboard shortcuts that enable you to choose menu options by just pressing a key combination. For example, to copy an object or text selection, most programs allow you to press Control-C (Windows) or Command-C (Mac) instead of selecting Copy from the Edit menu. When browsing through the items in a program’s menu bar, you should see the keyboard shortcuts located next to each option that has a shortcut available. The menu bar is a fundamental part of the graphical user interface (GUI), so it is worth you time to get familiar with it. You may even discover features you did not know about before.

Toolbar:-
A toolbar is a set of icons or buttons that are part of a software program’s interface or an open window. When it is part of a program’s interface, the toolbar typically sits directly under the menu bar. For example, Adobe Photoshop includes a toolbar that allows you to adjust settings for each selected tool. If the paintbrush is selected, the toolbar will provide options to change the brush size, opacity, and flow. Microsoft Word has a toolbar with icons that allow you to open, save, and print documents, as well as change the font, text size, and style of the text. Like many programs, the Word toolbar can be customized by adding or deleting options. It can even be moved to different parts of the screen.
The toolbar can also reside within an open window. For example, Web browsers, such as Internet Explorer, include a toolbar in each open window. These toolbars have items such as Back and Forward buttons, a Home button, and an address field. Some browsers allow you to customize the items in toolbar by right-clicking within the toolbar and choosing “Customize…” or selecting “Customize Toolbar” from the browser preferences. Open windows on the desktop may have toolbars as well. For example, in Mac OS X, each window has Back and Forward buttons, View Options, a Get Info button, and a New Folder button. You can customize the Mac OS X window toolbars as well. Toolbars serve as an always-available, easy-to-use interface for performing common functions. So if you haven’t made use of your programs’ toolbar options or customization features in the past, now is a good time to start!
Dialog Box:-
As the name implies, a dialog box serves to initiate a dialog with the user. It is a window that pops up on the screen with options that the user can select. After the selections have been made, the user can typically click “OK” to enter the changes or “Cancel” to discard the selections. It is customary for menu options that include an ellipsis at the end, such as “Preferences…” or “Save As…”, to open a dialog box when selected.
For example, if a user selects “Internet Options…” from the Options menu in Internet Explorer, a dialog box will pop up allowing the user to choose the default home page, change the security settings, empty the browser cache, and modify several other settings. Once the selections have been made, the user can click “OK” to use the new settings, or “Cancel” to discard the changes. Some Windows programs also have an “Apply” option that activates the selections without closing the dialog box. When a user selects “Open…” from the File menu, an “Open dialog box” appears, allowing the user to browse the hard drive and other disks for files to open. When “Save As…” is chosen from the File menu, a “Close dialog box” pops up, allowing the user to type the name of the file and choose where to save it. While dialog boxes may not seem too exciting, they provide an intuitive way to communicate with the computer and are an essential part of today’s computer interfaces.
Elements of dialog box:-
A dialog box is a secondary window that allows users to perform a command, asks users a question, or provides users with information or progress feedback.

1.Ok Botton:-
When clicking on the ok button sace the setting or carry out the commands specified in the dialog box and close the dialog box.
2. cancel button:-
When clicking on the cancel button, close the dialog box and restore the setting in the dialog box to the state they were in when the dialog box wa opened.
3. Apply botton:-
Use the apply button to carry out the changes users specify in the dialog box without closing the dialog box.
4. Tab:- In some dialog boxes options are divided into two or more tabs.
5. Options Button:-
Options buttions presents a group of releted choices from which we can choose only one.
Stand by:-
When electronic devices are receiving power but are not running, they are in standby mode. For example, a television is in standby mode when it is plugged in, but turned off. While the TV is not “on,” it is ready to receive a signal from the remote control. An A/V receiver is also in standby mode when it is plugged in and turned off. This is because the receiver may be activated by receiving input from a connected device or by being turned on directly with the remote control. In other words, these devices are “standing by,” waiting to receive input from the user or another device. When a computer is in standby mode, it is not completely turned off. Instead, it has already been turned on, but has gone into “sleep” mode. Therefore, when referring to computers, “Sleep” and “Standby” may be used synonymously. A computer in standby mode requires a small amount of current, called a “trickle charge,” that keeps the current state of running software saved in the computer’s RAM. However, because the computer is in sleep mode, the CPU,video card, and hard drive are not running. Therefore, the computer uses very little power in standby mode.
Hibernate:-
If you are not going to use your computer for a few hours, it is a good idea to put it to sleep (also known as standby mode) to save power. If you are not going to use the computer for more than a day, it is usually best to turn it off. However, some Windows computer offer an option that combines the benefits of sleep mode and powering down the computer, called “Hibernate.”
When you select Hibernate, the computer saves the current state of the system from the computer’s RAM to the hard disk, then shuts down. When the computer is restarted, instead of going through the typical boot sequence, the previously saved state is automatically loaded into the RAM. The open windows and running programs from your previous session appear just as they were when the computer entered Hibernate mode. Basically, Hibernate mode acts like Standby mode, except the computer can be completely turned off. This is especially helpful for laptopcomputers, which will slowly lose their battery charge if they are left in sleep mode. To make your computer hibernate, select “Turn Off Computer” from the bottom of the Windows Start Menu. Then press and hold the Shift key when the dialog box appears. The “Standby” option should change to “Hibernate.” If the Standby option does not change, you may need to enable Hibernate mode in Windows. This can be done by opening the “Power Options” control panel, clicking the Hibernate tab, and checking the box that says, “Enable hibernation.”
Clipboard:-
The clipboard is a temporary storage area from information that we have copied or moved from one place to somewhere else. We can select text or graphics and then use the cur or copy commands to move our selection to the clipboard, where it will be stored until we use the paste command to insert it elsewhere.
We hope the above Microsoft Windows Class 7 Computer Science are useful for you. If you have any questions then post them in the comments section below. Our teachers will provide you an answer. Also refer to MCQ Questions for Class 7 Computer Science