Please refer to Microsoft Office Class 7 Computer Science notes and questions with solutions below. These revision notes and important examination questions have been prepared based on the latest Computer Science books for Class 7. You can go through the questions and solutions below which will help you to get better marks in your examinations.
Class 7 Computer Science Microsoft Office Notes and Questions
Introduction:-
Microsoft office is an office suite of interrelated desktop applications, servers and services for the Microsoft windows. It is a horizontal market software that is used in a wide range of industries. Microsoft office was introduced by Microsoft in 1989 for macnitosh. Again it introduced office for windows in 1990. After that many new versions were realesed. The core programs that made up the first version of Office (Word, Excel and PowerPoint) existed as separate applications as far back as the early 1980s. It wasn’t until 1989, however, that Microsoft bundled these programs together into the product called Microsoft Office 1.0 (for Macintosh, that is; the first Windows version would follow a year later). When MS Office for Windows was released in 1990, its chief competitors were both industry giants: WordPerfect (for word processing), and Lotus 1-2-3 (for spreadsheets). Both of these products already had dominant market positions when Microsoft Office was launched.
Microsoft Office quickly gained on the competition, however — businesses liked the idea of having their primary workstation apps come from a single software company, which hinted at greater integration between critical applications. More to the point, many of these businesses were using PCs powered by Microsoft Windows (running over MS-DOS), giving Microsoft Office even more perceived integration sparkle.It also helped that Office was friendlier to the growing number of mouse-centric PC users of the early 1990s. The clickability factor made it more appealing than other programs, such as WordPerfect, which were often heavily keyboard-driven.
Companies also liked the idea of dealing with a single software vendor, which provided simpler software licensing and support contracts. This convenient arrangement would generate billions of dollars in Office-related revenue for Microsoft over the next two decades, and would effectively bury Lotus 1-2-3, WordPerfect and all other comers.Microsoft Office expanded from the original “Big Three” apps as new versions of the suite were released. A basic e-mail client, Microsoft Mail, was added not long after the debut of Office 1.0. Microsoft Access, a simple but powerful database management system, made its debut in 1993 as part of Office Professional 3.0.
Microsoft Word:-
Word Processing is perhaps the most common and comparatively easier application to work on any computer. A word processor lets you to change words or phrases, to move whole sections of text from one place to another, store blocks of text, align margins all in few seconds. Use of word processors has changed the look of official correspondence, reports, and proposals etc. to a great extent. MS Word is an advanced word processing product by Microsoft company. The powerful features of Word will allow you to create even graphic based multicolumn publications such as Fliers, News letters and Internet web pages.

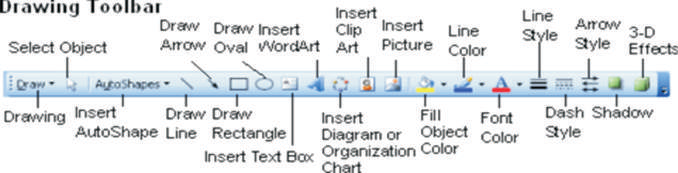
Viewing the Toolbar:-
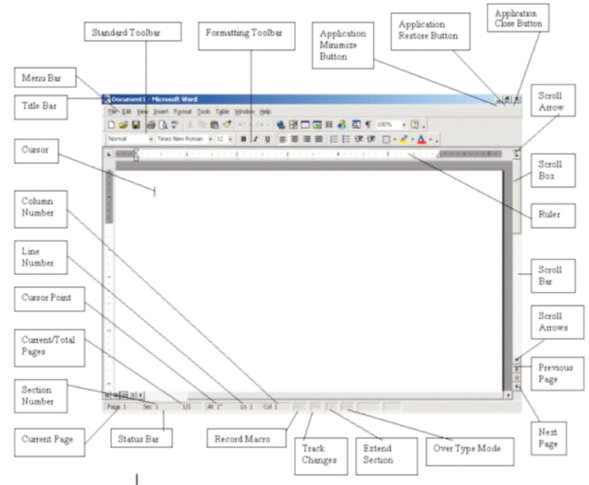
Menu bar:-
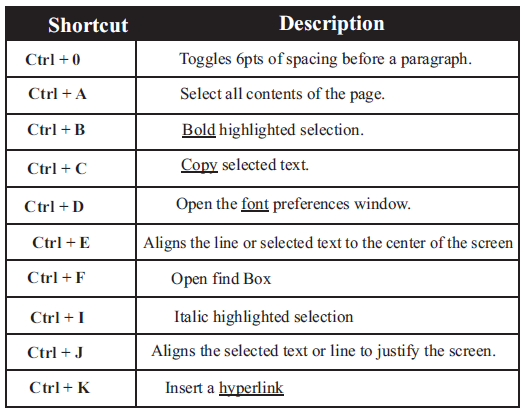
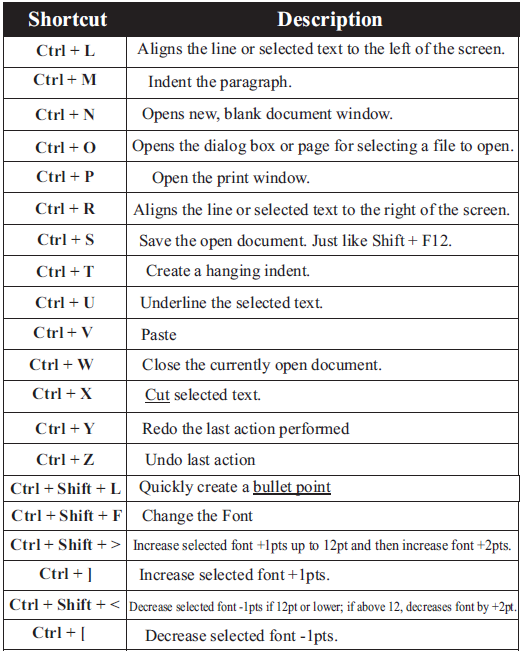
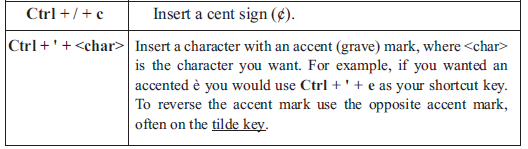
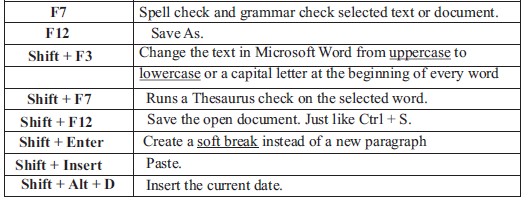
This is the traditional windows style drop-down menu. When you point to any menu title and click once with the mouse, the menu will open displaying all the commands available under this menu. Clicking on the desired command would tell Word to execute that command. Some commands have ellipses (…) in front of them. These commands have further sub commands. Commands appearing in dim mode cannot be executed unless the prerequisite functions required by that command have been performed, e.g. you cannot use the Copy or Cut command from the Edit menu unless you have selected a piece of text first. Many commands also have a keyboard shortcuts specified against their names.
Standard toolbar:-
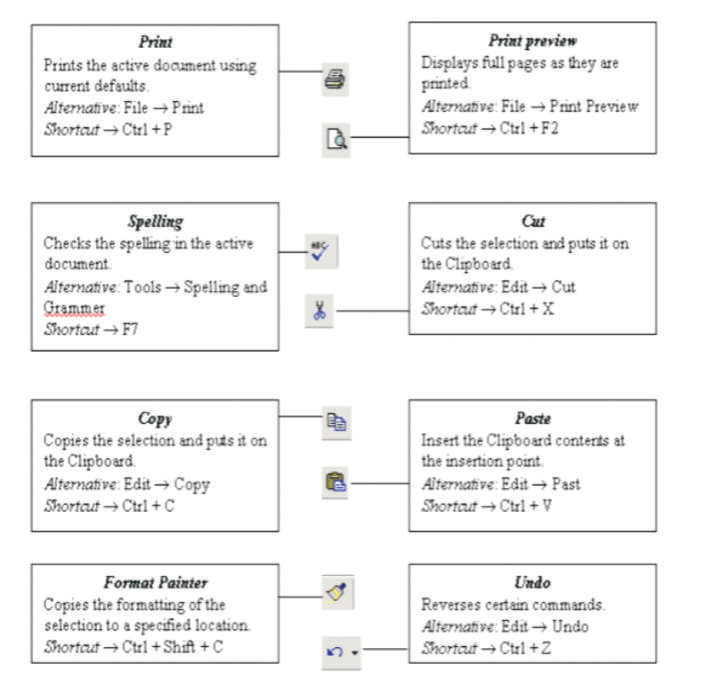
Toolbars contain buttons, drop-down menus and other controls that help you to quickly alter the appearance and arrangement of documents by executing a variety of word commands. Toolbars are very helpful and convenient in quickly executing commands without having to go through menus. The standard toolbar contains icons for basic functions like opening files, saving files, printing files, cut, copy, paste etc.
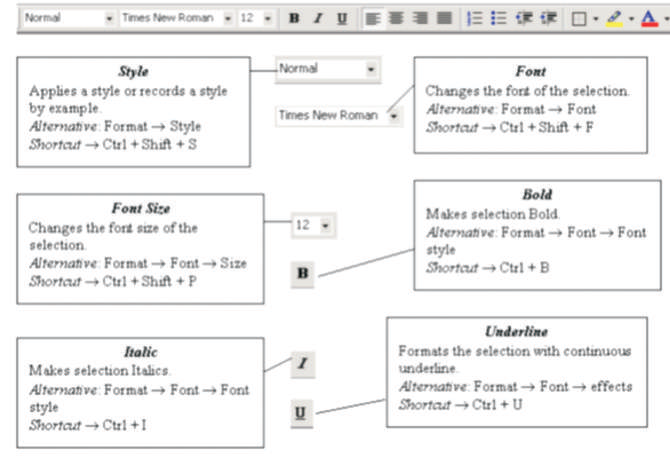
Formatting Toolbar:-
Commands without having to go through menus. The standard toolbar contains icons for basic functions like opening files, saving files, printing files, cut, copy, paste etc.
Ruler:-
The Ruler lets you make changes to margins and indents, and helps you create document as per dimensions required.
Scroll tools:-
These helps you travel within your document. You can go anywhere, up and down, right and left in your document mainly by two ways: Using the horizontal and vertical scroll bars with the help of the mouse; Or using the keyboard to press PgUp, PgDn, Home, End and arrow keys.
Status bar:-
Also called the Status Area, this is the normally the last line on your screen. This gives the following information about your work—
- Current Page
- Section Number
- Current/Total pages in the document
- Current Cursor Position (where the cursor is presently located)
- Current Line Number
- Current Column Number
- Record Macro-whether macro recording is On or not
- Track Revision-whether revisions have been made or not
- Extend Selection mode
- Over type mode-whether you are in Insert mode or overwrite
Cursor:-
Also called the Insertion Pointer, this denotes the place where text, graphics or any other item would be placed when you type, overwrite or insert them. This looks like a tall, skinny toothpick and keeps blinking so that you can locate it easily.
Mouse pointer:-
When your mouse pointer looks like an I-beam you should be able to move it freely on the screen. This is used for either placing the cursor at the desired place (take the mouse pointer there and click) or choosing any command either from the menu or from toolbars. The mouse pointer changes shape when in the process of doing certain tasks and the cursor disappears.

File management
Creating a New Document:-
- Click on File Menu
- Select and click New option
- Otherwise click button on the standard toolbar.
Opening an Existing Document :
- Click File Menu
- Select and click Open option
- Other wise click button on the Standard toolbar.
- Double click on the file from the open window Saving a Document
- Click File Menu
- Select and click Save button.
- Other wise click button o on the Standard toolbar.
- Oving through the document
- Open any word document. You can move the cursor to any
- Location on the screen by using the arrow keys on the keyboard.
- Right arrow key is used to move one position to the right of the cursor
- Left arrow key is used to move one position to the left of The cursor.
- Up arrow key is used to move one position to the top of the cursor.
- Down arrow key is used to move one position to the down of the cursor.
- Page Up key is used to move down the screen at a time
- Page down key is used to move up the screen at a time
- Hold down Ctrl key and press Home to move to beginning of the document.
- Hold down Ctrl key and press End to move to end of the document.
- You can move to any position on the screen by moving the cursor with the mouse.
- You can use scroll bars to scroll the text upward and down ward.
Closing a Document
- Click File menu
- Select and click Close button.
- Other wise click butt on menu bar
Editing Word document:-
Cut , Copy and Paste options These options will allow you to Cut or Copy a piece of text from one location and to paste at a new location.
To do these functions,
- Place the cursor at the begining of the text to be selected.
- Drag the mouse pointer over the text. The text will now appear in reverse vedeo as shown below:
- Click Edit menu and then click on Cut option (or) click icon on the Standard Toolbar. Move the cursor to the place where you want the text to be pasted.
- Click Edit menu and then click Paste option (or) click icon on the Standard Toolbar.
For copying the text from one location to other location the same procedure is to be followed. The difference between Cut and Copy is that while using the Cut option the text will be removed from its original location and pasted at a new location, where as when using Copy option a copy of the selected text is pasted at new location without disturbing the original text. Searching text:-
- Open any document.
- Click Edit menu and then click Find option. You will get a screen as shown below.
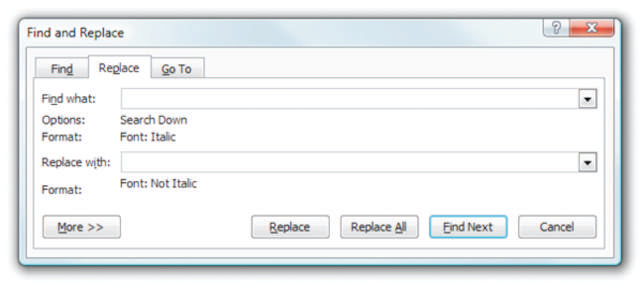
Replacing text:-
- Open any word document
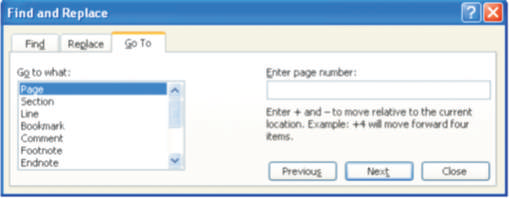
Click Edit menu and then click Replace option. You will get the dialog box as shown below and type the word with which you want to replace. Moving the cursor to a specific page:-
- If your word document contains more than one page, you can directly go to specified page by clicking Edit menu and then clicking Go To option. You will get the dialog box as shown below.
Formatting documents:-
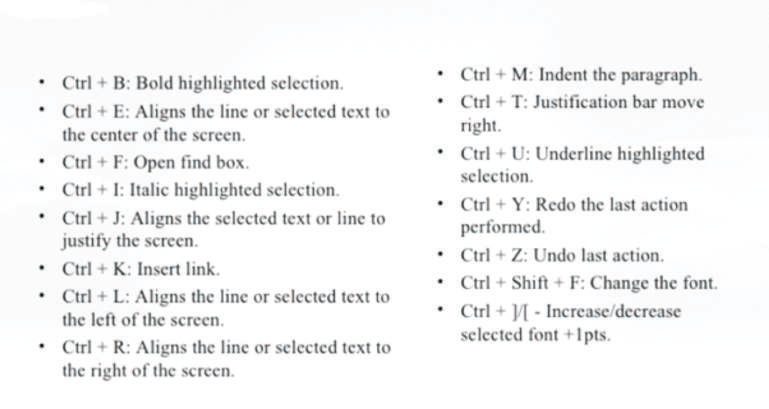
Bold, Underline and Italicize the selected text
- Open a word document.
- Block the text by first clicking at the start of the text and holding the left mouse button and drag to the desired position and then release the left mouse button. The selected area will be highlighted.
- Move the mouse pointer to the button on the Standard
Toolbar and click once.
- Move the mouse pointer outside your text and click to release the highlighting. Your text will now appear in BOLD FACE.
- Like this you can underline or italicize the desired text by using the following buttons
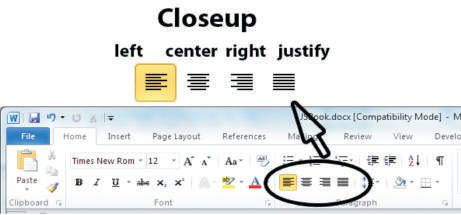
Left aligning, centering , right aligning and justifying text
Indenting Paragraphs
– Select a paragraph with the mouse
– Click on the Right (increase) Indent b button on the toolbar.
– Leave the highlighting on and click once more on the Right Indent button.
– Click once on the Left Indent button. Your text should now be indented by one Tab stop. Each time you click, the paragraph is moved one tab stop.
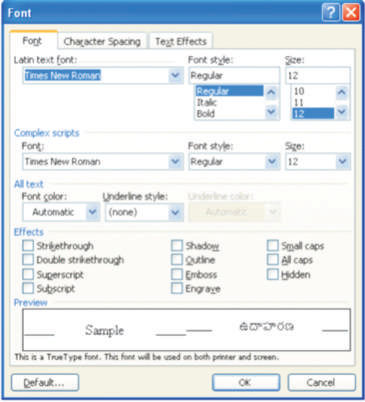
Changing case of text
– You can change the selected text into either UPPERCASE, lowercase, Title case or tOGGLE cASE
– Highlight the text. Select the Format menu option
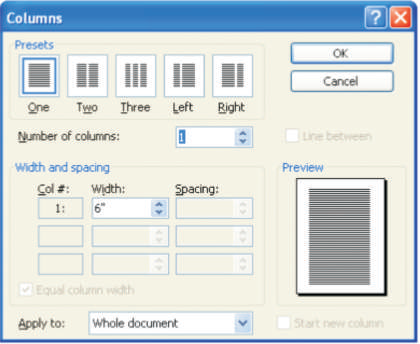
Creating column wise documents
– Open any word document file.
– Click Format menu and click Columns option. You will get a screen as shown below:
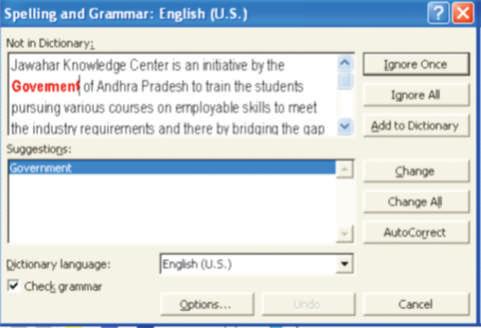
Spelling and Grammar Checking of word document
- Open any word document.
- Click Tools menu and then click Spelling and Grammar option. You will get the below dialog box.
Note:-
All words that appear red color in First box are spelling mistakes. If you want to accept the suggested word, in the second box click on Change. If not, click Ignore button. You can also add a word to the dictionary by clicking on the Add button.
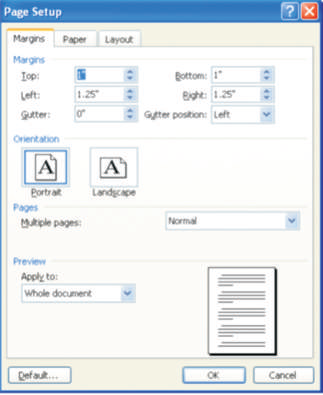
Printing document
Set Page Setup options
– Click File menu
– Select and click Page Setup option. You will get the following screen.
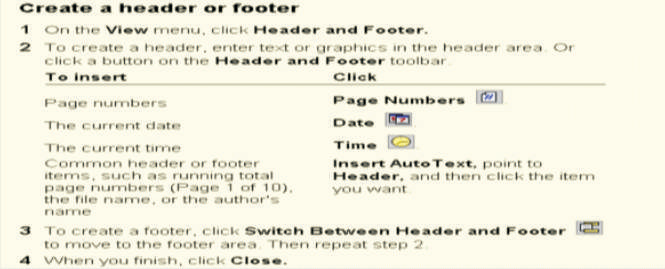
Creating Header and footer:-
You can create header and footer that include text or graphics. For example, page numbers, the date, a company logo, the document’s title or file name, the author’s name, and so on.
You can use the same header and footer throughout a document or change the header and footer for part of the document. For example, use a unique header or footer on the first page, or leave the header or footer off the first page. You can also use different headers and footers on odd and even pages or or part of a document.
To Create header or footer
Inserting pictures into the document:-
Inserting Clip arts
- Click Insert menu, click picture and then click Clip Art. You will get screen as shown below
Creating Tables
Tables are preferred when compared to using spacebar or tab for alignment to give a table format, but Word has another excellent feature for alignment called “Tables”. This feature is used to create financial reports, catalogues, accounts etc. Tables consist of rows and columns. The text can be typed in the cells. The size, shape and appearance of a cell are controllable features. You can also convert a text to a table and a table back to text. It also supports importing and exporting data onto a spreadsheet.
To create a table using Insert Tables Button
- Move the cursor to the place where you want to insert the table
- Choose tables button from the Standard Toolbar
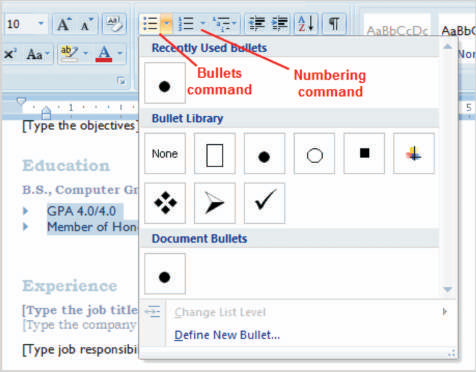
- Drag the mouse to highlight the desired number of rows and columns in the tables menu Numbering Pages
- Open any word document.
- Click Insert menu and then click Page Numbers option.
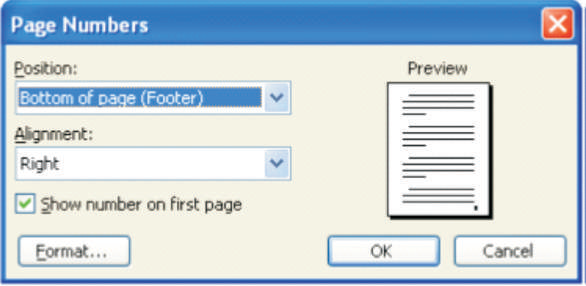
By default the page number is placed at bottom right corner within the page. You can change the position of the page numbers by selecting other options like “top of the page, center” from the Drop down List boxes. Choose the Format button to review the other page numbering options or choose OK button to set the changes made in the Page Numbering dialog box.
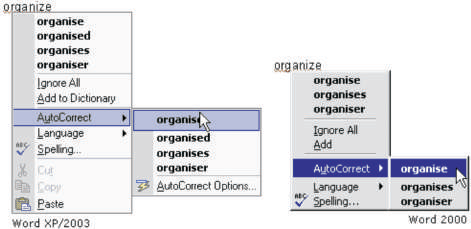
Auto correct:-
Auto Correct stores a list of common typographical errors and their spellings. When you make an error, Word detects it and inserts the correctly spelled version of the word. You can add words to the Auto Correct list, based on the mistakes you make. Look at the Auto Correct dialog box.
Auto Format
Use Auto Format to reformat an entire document using a selected document template as a basis for the changes. Templates are supplied with Word, or you can create your own templates based on a document in which styles are applied to text, headings, lists and other text and graphic elements within the document. You can use Format/Style Gallery to view and apply available style templates to your document. Autoformat applies a style to every paragraph and heading. It typically replaces indentations created with spaces or tabs with paragraph indents, asterisks and dashes with bullets, and so on.
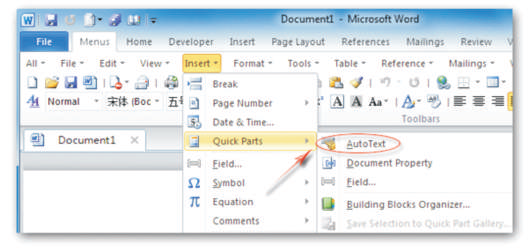
Auto Text
The Auto Text feature lets you store commonly used passages, such as addresses, contract clauses, etc., and insert them whenever needed with a click of your mouse to create an Auto Text entry.
Select a graphic or text block such as your name and address in your document.
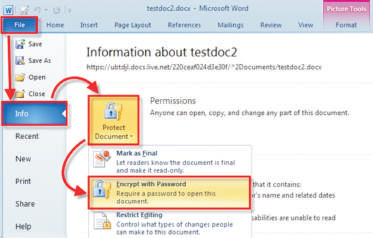
Password Protecting the document
– Open any word document.
– Click Tools menu and then click Options Click Security tab. You will get screen as shown below.
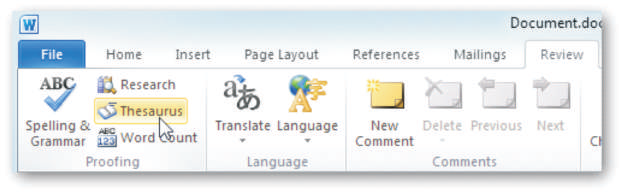
Thesaurus
The tools /Thesaurus menu selection gives you possible meanings and synonyms for selected words in your documents. This helps you be more precise in your writing. To use the Thesaurus, position the cursor in front of a word or highlight it. And Right Click and Then you will find a drop down menu and select synonyms option select Thesaurus menu as shown below.
Creating a Mail Merge document
Following are steps involved in creating a Mail Merge document.
– Create a new data source and enter information
– Create the main document
– Insert fields into the main document.
– Merge data source and main document.


Microsoft Excel:-
Microsoft Excel is a spreadsheet program for Windows and Macintosh computers. It is part of the Microsoft Office suite, which includes other productivity programs, such as Word and Power Point.
Though Excel is developed by Microsoft, the first version of the program was released for the Macintosh in 1985. It wasn’t until 1987, when Microsoft introduced Windows 3.0, that Excel was made available for Windows. Since then, Microsoft has supported the program on both platforms, releasing updates about every two years.
Some other popular spreadsheet programs include IBM Lotus 1-2-3 (for Windows) and the AppleWorks spreadsheet program (for the Mac). However, Microsoft Excel has led the spreadsheet market for many years and continues to be the most popular spreadsheet program for both businesses and consumers.
Microsoft Power Point:-
Power Point is a presentation program developed by Microsoft. It is included in the standard Office suite along with Microsoft Word and Excel. The software allows users to create anything from basic slide shows to complex presentations.
Power Point is often used to create business presentations, but can also be used for educational or informal purposes. The presentations are comprised of slides, which may contain text, images, and other media, such as audio clips and movies. Sound effects and animated transitions can also be included to add extra appeal to the presentation. However, overusing sound effects and transitions will probably do more to annoy your audience than draw their attention. (Yes, we have all heard the car screeching noise enough times for one lifetime.)
Most PowerPoint presentations are created from a template, which includes a background color or image, a standard font, and a choice of several slide layouts. Changes to the template can be saved to a “master slide,” which stores the main slide theme used in the presentation. When changes are made to the master slide, such as choosing a new background image, the changes are propagated to all the other slides. This keeps a uniform look among all the slides in the presentation.
When presenting a PowerPoint presentation, the presenter may choose to have the slides change at preset intervals or may decide to control the flow manually. This can be done using the mouse,keyboard, or a remote control. The flow of the presentation can be further customized by having slides load completely or one bullet at a time. For example, if the presenter has several
bullet points on a page, he might have individual points appear when he clicks the mouse. This allows more interactivity with the audience and brings greater focus to each point.
Power Point presentations can be created and viewed using Microsoft Power Point. They can also be imported and exported with Apple Keynote, Apple’s presentation program for the Macintosh platform. Since most people prefer not to watch presentations on a laptop, PowerPoint presentations are often displayed using a projector. Therefore, if you are preparing a PowerPoint presentation for a room full of people, just make sure you have the correct video adapter.
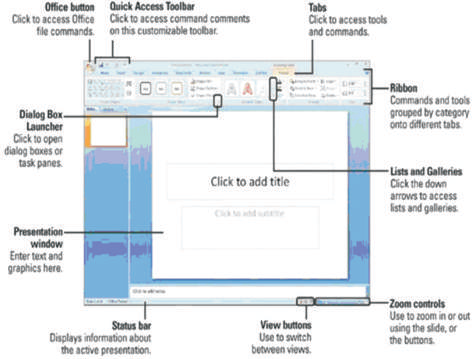
The power Point Screen

Microsoft Access:-
Microsoft Access, often abbreviated “MS Access,” is a popular database application for Windows. Access allows users to create custom databases that store information in an organized structure. The program also provides a visual interface for creating custom forms, tables, and SQL queries. Data can be entered into an Access database using either visual forms or a basic spreadsheet interface. The information stored within an Access database can be browsed, searched, and accessed from other programs, including Web services.
While Access is a proprietary database management system (DBMS), it is compatible with other database programs since it supports Open Database Connectivity (ODBC). This allows data to be sent to and from other database programs, such as MS SQL, FoxPro, File maker Pro, and Oracle databases. This compatibility also enables Access to serve as the back end for a database- driven website. In fact, Microsoft Front Page and Expression Web, as well as ASP. NET have built-in support for Access databases. For this reason, web sites hosted on Microsoft Windows servers often use Access databases for generating dynamic content.
We hope the above Microsoft Office Class 7 Computer Science are useful for you. If you have any questions then post them in the comments section below. Our teachers will provide you an answer. Also refer to MCQ Questions for Class 7 Computer Science